Parlons du tissage de cercles en tapisserie ! Lorsque je tisse des cercles à face de trame, je dessine toujours mon cercle directement sur la chaîne et je suis précisément ces points sur la chaîne. Cela signifie que je recouvre complètement le dessin. Je ne suis pas très exigeante quant à la symétrie exacte de mes cercles, donc mon pas ne sera pas exactement le même de tous les côtés, mais je tiens à souligner quelques points concernant le pas (diminution/augmentation) sur un cercle qui peuvent ne pas sembler évidents pour un tisserand de tapisserie débutant, ainsi que d'autres conseils importants.

Lorsque vous tissez des formes dans une tapisserie, vous devez toujours construire la forme dont la taille diminue en premier. Pour les cercles, cela signifie tisser d'abord une partie de l'espace négatif de l'arrière-plan, comme sur la photo ci-dessus. Nous arrêtons de tisser cette zone avant qu'elle ne commence à augmenter de forme. C'est alors que nous pouvons tisser notre cercle entier, puis procéder au remplissage de l'espace négatif de chaque côté du cercle.

La raison pour laquelle nous tissons les formes de cette manière est d'éviter de bloquer les chaînes qui pourraient ne pas pouvoir créer de foule. Si nous ne parvenons pas à créer de foule, la seule façon de tisser votre trame dans la chaîne est d'utiliser une aiguille à tapisserie, ce qui prend plus de temps et est plus difficile. L'illustration ci-dessous montre comment les chaînes vers lesquelles pointent les flèches seraient empêchées de créer une foule si nous tissions notre cercle avant de tisser cette partie de l'arrière-plan en premier. Bien que ce ne soit pas impossible à tisser, ces chaînes sont désormais difficiles à atteindre, ce qui rend votre processus beaucoup plus lent qu'il ne devrait l'être.

Les cercles tissés ont-ils des lignes droites ? En effet, c'est le cas !

Les cercles tissés ont quatre lignes droites !
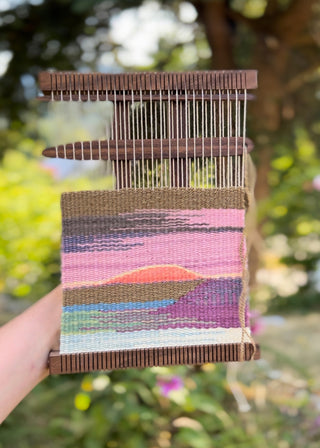
Laissez-moi vous expliquer : si vous tissez des cercles d'une circonférence de trois pouces sur un métier à tisser réglé à six extrémités par pouce comme dans mon exemple ci-dessus, le haut et le bas de votre cercle seront des lignes droites composées de huit extrémités de chaîne chacune. La longueur de votre ligne droite changera en fonction de la taille de votre cercle et le nombre d'extrémités de chaîne changera en fonction de l'EPI (extrémités par pouce) sur lequel votre métier à tisser est réglé.
De même, les côtés de mes cercles ne présentent aucun pas. Dans le tissage ci-dessus, mes cercles montent tout droit sur 11 tours reflétant la largeur du haut et du bas de mes cercles.
Comment dessiner correctement sur votre chaîne

Lorsque vous dessinez des points sur votre chaîne, utilisez des marqueurs pour tissu, des feutres Sharpies Rub-a-Dub ou d'autres marqueurs permanents dont vous avez testé la résistance au lavage. Testez les marqueurs permanents non-tissu en dessinant sur le tissu, puis en le jetant dans la machine à laver avec votre prochaine charge de jeans pour voir si le stylo reste sur le tissu. Si le marqueur reste en place, vous pouvez continuer. Vous ne voulez jamais risquer que votre marqueur s'infiltre dans votre trame lorsque vous le bloquez ou par temps humide.
Je trace souvent des objets comme des tasses ou des bols pour obtenir un cercle parfait.
- Placez votre objet circulaire sur la tapisserie
- Créez un point distinct de marqueur de tissu autour du périmètre de l'objet sur chaque chaîne qu'il rencontre.
- Vous pouvez choisir de marquer ou non le côté vertical du cercle. Dans mon exemple, je ne l'ai pas fait. Mes lignes verticales se situent entre les deux marques les plus éloignées.
- Lors du tissage, recouvrez complètement votre marqueur avec la chaîne avec laquelle vous tissez votre espace négatif.
L'image ci-dessus montre la chaîne avec un marqueur pour tissu dessus. J'ai placé un morceau de papier blanc derrière la chaîne pour rendre les marques plus faciles à photographier.
Battez toujours de manière constante
Un battement et une tension constants sont essentiels ! Si vous avez une tension de chaîne uniforme et serrée, vous réussirez mieux à battre bien et uniformément, et donc vos formes conserveront leur forme et resteront proportionnelles les unes aux autres.
Retrouvez tous mes ateliers de tissage en ligne sur https://www.everleayarn.ca/pages/online-everlea-workshops